
If you've ever tried to vacuum seal a bag of soup only to watch it get sucked straight into your machine, you're not alone. Vacuum sealing liquids is one of the most common frustrations for home cooks — but once you know the right technique, it's one of the most powerful tools in your kitchen.
Whether you're trying to meal prep soups for the week, preserve a batch of homemade stock, store marinated proteins, or lock in fresh sauces before they turn, understanding how to use a vacuum sealer properly with liquids can save you hours of time and significantly cut down on food waste.
In this guide, we'll walk you through exactly what vacuum sealing liquids means, how it works, when it makes sense, which foods work best, and — most importantly — how to do it without making a mess or ruining your machine.
Quick Answer
Vacuum sealing liquids is possible, but it requires one of two techniques: the freeze-first method (freezing the liquid before sealing) or the seal-line method (leaving enough headspace and tilting the machine so liquid doesn't reach the pump). The freeze-first approach is more reliable and is the method we recommend for most soups, broths, and sauces. Done correctly, vacuum-sealed liquids last 3–5 times longer in the freezer than liquids stored in standard containers.
What Is Vacuum Sealing, and Why Is It Tricky With Liquids?
Vacuum sealing is a food preservation method that removes air from a storage bag before heat-sealing it shut. Without oxygen, the microorganisms that cause food to spoil — mold, bacteria, and yeast — slow down dramatically. The result: food stays fresh significantly longer, whether stored in the fridge, freezer, or pantry.
Most people learn how to use a vacuum sealer starting with dry foods — meats, cheeses, nuts, and vegetables. These are forgiving. Liquids are different.
The suction that pulls air out of a bag doesn't distinguish between air and liquid. If your bag is too full, or if you don't use the right technique, that suction will pull the liquid right into the machine's sealing mechanism — clogging it, damaging it, or creating a leak that ruins the seal entirely.
That's the mess most people are trying to avoid. And with the right approach, it's completely preventable.
How Does Vacuum Sealing Work With Liquids?
Removes Oxygen
The vacuum pump draws air out of the sealed bag through a small channel. For liquids, the challenge is that liquid molecules can be drawn through this channel alongside the air if the bag is overfilled or not positioned correctly.
Reduces Moisture Loss
Once sealed, vacuum bags create an airtight barrier that prevents evaporation. Your soup retains its full moisture and flavor, unlike open containers that can dry out or develop a skin.
Slows Oxidation
Oxidation — the same process that turns a cut apple brown — degrades color, flavor, and nutritional value in foods. By removing oxygen, vacuum sealing locks in the freshness of your broth, sauce, or marinade for weeks or months longer.
Helps Prevent Freezer Burn
Freezer burn happens when moisture on the surface of food evaporates in the dry freezer environment. Vacuum-sealed bags eliminate the air pocket that causes this, keeping soups and sauces tasting as fresh as the day you made them.
The Two Methods for Vacuum Sealing Liquids

Method 1: The Freeze-First Method (Recommended)
This is the most foolproof approach, and it's the one we use most at Fresko.
- Cool your liquid completely. Never try to vacuum seal a hot or even warm liquid. Let soups, stocks, and sauces come to room temperature, then refrigerate until cold.
- Pre-portion into bags or containers. Decide how much you want in each bag — single servings work well for meal prep.
- Freeze until solid. Pour the liquid into the vacuum bag (leaving at least 3 inches of headspace), lay flat on a baking sheet, and freeze until fully solid. This usually takes 4–6 hours or overnight.
- Vacuum seal the frozen block. Once frozen, the liquid won't get sucked into the machine. Run it through your vacuum sealer normally.
- Label and store. Write the contents and date on each bag. Stack flat in the freezer.
Pro tip: Using a silicone ice cube tray or muffin tin to pre-freeze portions first gives you neat, stackable blocks that slide perfectly into standard vacuum bags.

Method 2: The Seal-Line / Tilt Method (For Smaller Quantities)
If you need to seal a liquid without freezing it first — for example, a marinade you're using same-day or a sauce going straight into the fridge — the tilt method works well for smaller quantities.
- Fill the bag no more than one-third full. Leave generous headspace.
- Fold the top of the bag outward before placing it in the machine. This keeps the inner seal area clean and dry.
- Tilt the machine so the open end of the bag is elevated above the liquid level. Gravity keeps the liquid away from the seal bar.
- Begin the vacuum process slowly. Many vacuum sealers have a "moist" or "gentle" mode — use it. Stop the suction manually just before the liquid reaches the seal line.
- Seal immediately. Hit the seal button to close the bag.
This method takes practice and is best suited for low-volume liquids. For anything more than a cup or two, freeze first.
Benefits of Vacuum Sealing Liquids
1. Dramatically Longer Freshness
Homemade stock stored in an open container lasts 4–5 days in the fridge. Vacuum sealed and frozen, it can last 2–3 years without significant quality loss. That's a meaningful difference for anyone who batch cooks.
2. Better Flavor Preservation
The airtight seal keeps volatile aromatic compounds — the ones that give your broth its depth and your tomato sauce its brightness — locked inside the bag instead of evaporating into your fridge.
3. No More Freezer Burn
Soups and sauces are particularly vulnerable to freezer burn in standard zipper bags. Vacuum-sealed bags eliminate the air gap entirely, keeping texture and taste intact.
4. Better Portion Control
Sealing liquids in single-serving or family-sized portions means you only thaw what you need. No more defrosting an entire pot of chili when you only want one bowl.
5. Less Food Waste
According to USDA estimates, American households waste roughly 30–40% of their food supply — much of it liquids and cooked meals that go bad before they're eaten. Vacuum sealing lets you extend the life of everything you cook, so less ends up in the trash.
Limitations of Vacuum Sealing Liquids
It's important to know what vacuum sealing cannot do:
- It does not kill bacteria. Vacuum sealing slows bacterial growth by removing oxygen, but it does not sterilize food. Never vacuum seal liquids that have already spoiled or that have been sitting at room temperature for more than two hours.
- It does not replace refrigeration or freezing. Vacuum-sealed liquid still needs to be kept cold. Most sealed soups and broths should be frozen for long-term storage; refrigerated sealed liquids still have a shelf life of 1–2 weeks.
- Some liquids need special preparation. High-fat liquids like cream soups can develop off-flavors if frozen improperly. Let them cool completely before sealing and consider adding stabilizers like a small amount of cornstarch if reheating is a concern.
- Bag quality affects results. Thin or low-quality bags are more prone to punctures and seal failures. Thicker, embossed bags designed for vacuum sealers perform significantly better, especially for liquids with chunks or bones.
- Carbonated liquids cannot be vacuum sealed. The pressure difference will cause carbonation to escape, making the process ineffective and potentially dangerous for the machine.
Best Foods to Vacuum Seal Using the Liquid Method
| Food / Liquid | Suitable for Vacuum Sealing? | Notes |
|---|---|---|
| Chicken or beef broth | ✅ Yes | Freeze first; portion into 1–2 cup servings |
| Tomato-based soup | ✅ Yes | Freeze first; leave 3" headspace for expansion |
| Cream-based soup | ✅ Yes (with care) | Cool fully; may separate slightly on reheating |
| Chili with beans | ✅ Yes | Freeze in flat portions; great for meal prep |
| Marinades (raw meat) | ✅ Yes | Tilt method works; use same-day or freeze |
| Pasta sauce | ✅ Yes | Freeze first; excellent for batch cooking |
| Smoothies / juice | ✅ Yes | Freeze first in ice cube trays |
| Wine (for cooking) | ✅ Yes | Seal-line method; store in fridge up to 2 weeks |
| Carbonated beverages | ❌ No | Pressure incompatibility; damages machine |
| Raw eggs (whole) | ❌ No | Shell creates puncture risk; crack and freeze instead |
| Hot liquid (above 100°F) | ❌ No | Must cool to room temp before sealing |
| Dairy milk | ⚠️ With care | Short fridge life; freeze immediately after sealing |
Common Mistakes When Vacuum Sealing Liquids

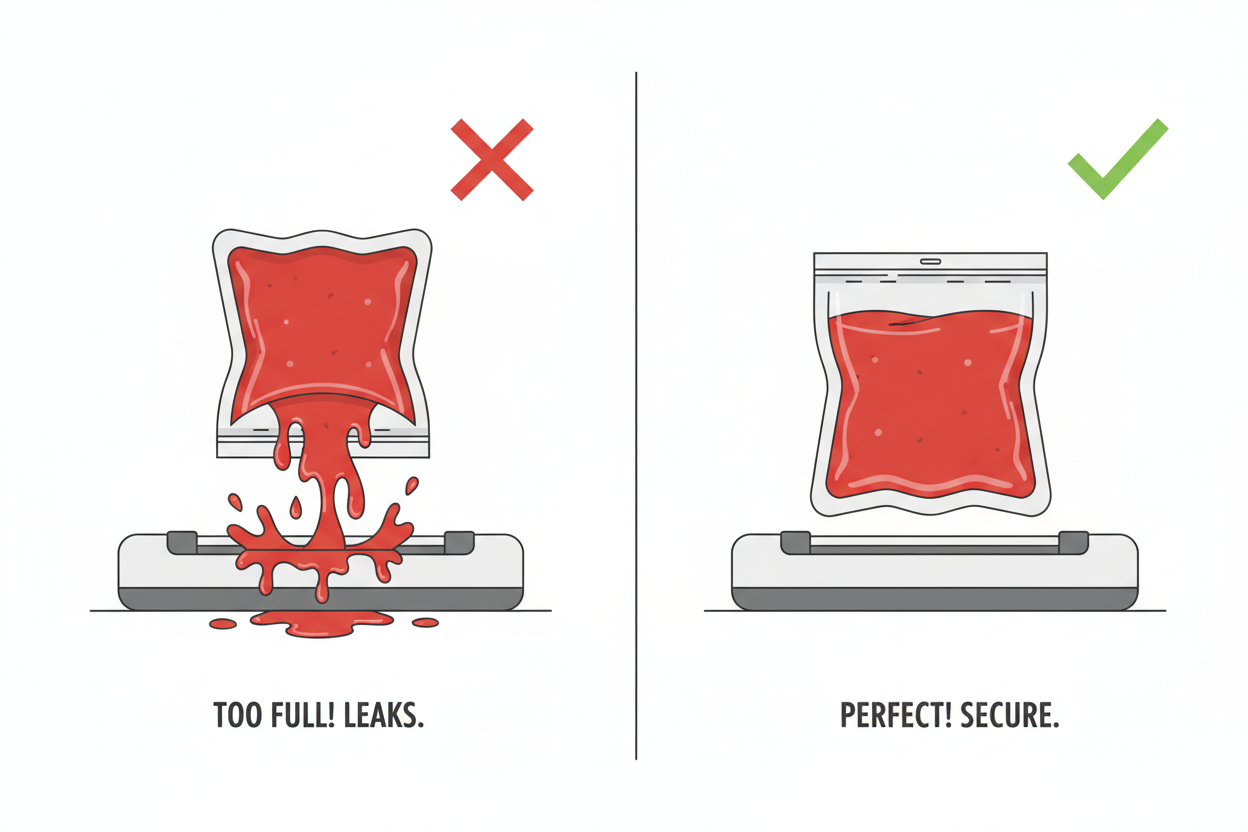
Mistake #1: Overfilling the Bag
This is the single most common reason liquid gets sucked into the vacuum sealer. As a rule, never fill a bag more than halfway when working with liquids, and always leave a minimum of 3 inches between the liquid and the open end of the bag. The suction is powerful — it will pull liquid toward the seal bar faster than you expect.
Mistake #2: Trying to Seal Warm or Hot Liquid
Hot liquids create steam, which the vacuum pump pulls out along with the air — carrying liquid droplets with it. Always let soups and sauces cool to room temperature, then refrigerate before attempting to seal. This one step prevents the majority of machine-damage incidents.
Mistake #3: Skipping the Freeze Step for Large Volumes
Many people try the tilt method on a full bag of soup and end up with a mess. For anything more than a cup or two of liquid, the freeze-first method is simply the safer, more reliable choice. Yes, it adds a few hours. But it also guarantees a clean, airtight seal every time.
Mistake #4: Using Low-Quality Bags
Not all vacuum bags are equal. Generic or off-brand bags often have thinner walls and weaker embossing channels, which means the machine can't generate a complete vacuum — and the seal is more likely to fail in the freezer over time. This matters even more with liquids, where a failed seal means a leak.
Mistake #5: Forgetting to Label
Vacuum-sealed soups all look the same after a few weeks in the freezer. Always write the contents and date on the bag with a permanent marker before storing. It takes five seconds and saves a lot of mystery meals.
Expert Tips From Fresko
At Fresko, we've spent years working with home cooks, meal preppers, and professional kitchens to understand what makes vacuum sealing work in the real world — not just in theory.
Here's what we've found:
The freeze-first method is almost always worth the extra step. We know it requires planning ahead, but the results speak for themselves: cleaner machines, better seals, and soups that taste just as good three months later as they did when you made them.
Silicone molds are your best friend. Pre-portioning liquid into silicone ice cube trays or muffin tins before freezing gives you perfectly sized blocks that fit neatly into bags. One batch of stock can fill six to eight individual portion bags in about ten minutes of prep.
Always run a test seal on each batch. Before stacking bags in the freezer, press gently on each sealed bag to make sure the vacuum held. If you feel any give or hear air hissing, re-seal before freezing.
For long-term storage (more than 3 months), double-bag anything with high liquid content. A second bag provides insurance against punctures from freezer stacking. It also makes the bags easier to stack flat, which maximizes freezer space.
Date your bags on two sides. When bags are stacked, you can only see one side. Writing the date on both sides means you can always read it, no matter how the bag is positioned.
Recommended Tools
Getting consistently good results with liquid vacuum sealing comes down to two things: a quality machine and quality bags.
For the machine, look for a vacuum sealer with adjustable suction speed, a moist food or gentle mode, and a drip tray or internal liquid catch. These features aren't optional when you're regularly sealing soups and sauces — they're what protect your machine over the long run.
For bags, choose thick, embossed, BPA-free bags that are compatible with your sealer. Embossing creates the channels that allow air to be evacuated evenly — without it, the vacuum can't pull air from the full length of the bag.
The Fresko Vacuum Sealer is designed with exactly these use cases in mind. It includes a dedicated moist food mode, a removable drip tray for easy cleaning, and consistent sealing pressure that works equally well for dry cuts of meat and liquid-heavy soups. Paired with Fresko's embossed vacuum storage bags, it's the cleanest, most reliable setup we've found for home liquid sealing.
Frequently Asked Questions
Can you vacuum seal soup?
Yes — but you need to use the right method. The freeze-first approach (freezing the soup before sealing) is the most reliable. For smaller quantities of liquid, the tilt method works too. Never try to vacuum seal hot or warm soup.
How long does vacuum-sealed soup last in the freezer?
Vacuum-sealed soup stored in the freezer typically lasts 2–3 years without significant quality loss. Compare this to 3–6 months for soup in a standard zipper bag. In the refrigerator, sealed soup lasts 1–2 weeks.
Can a regular vacuum sealer handle liquids?
Most standard vacuum sealers can handle liquids if you use the correct technique. The key is either freezing the liquid first, or using the tilt/seal-line method and stopping suction before the liquid reaches the seal bar. Sealers with a moist food mode make this easier.
How do you vacuum seal broth without a mess?
Freeze it first. Pour cooled broth into vacuum bags (fill no more than halfway), lay flat on a baking sheet, freeze solid overnight, then run through your vacuum sealer. This is the cleanest, most foolproof method.
Why did liquid get sucked into my vacuum sealer?
This usually happens when the bag is overfilled, the liquid is too warm, or the suction speed is too high. Try freezing the liquid first, reducing the fill level, or using your machine's gentle/moist mode.
Can you vacuum seal a marinade?
Yes. Vacuum sealing meat in a marinade actually accelerates marination — the vacuum opens the pores of the meat and pulls the marinade in faster. Use the tilt method for unfrozen marinades and keep the bag no more than one-third full.
Is it safe to vacuum seal liquids?
Yes, as long as you follow basic food safety rules: cool the liquid before sealing, keep sealed bags refrigerated or frozen, and never seal liquids that have already spoiled. Vacuum sealing slows bacterial growth but does not sterilize food.
Can you vacuum seal smoothies or juices?
Yes — use the freeze-first method. Pour your smoothie into a bag, freeze flat, then seal. Thaw in the fridge overnight or run the sealed bag under cold water for a quick option.
Conclusion
Learning how to vacuum seal liquids is one of the best investments you can make in your kitchen workflow. Once you've mastered the freeze-first method — and understood when the tilt method applies — you'll never go back to throwing half a pot of soup into a container and hoping for the best.
The key takeaways: always cool your liquid before sealing, freeze first for anything more than a cup, leave plenty of headspace, use quality bags, and label everything.
Vacuum sealing soups, broths, marinades, and sauces is completely doable at home. With the right technique and the right tools, you'll get airtight, mess-free results every time — and a freezer stocked with months of ready-to-go meals.
Ready to get started? Explore the Fresko Vacuum Sealer and our full range of compatible vacuum storage bags to find the right setup for your kitchen.
Related guides you might find helpful:
- How to Use a Vacuum Sealer: The Complete Beginner's Guide
- How Long Does Vacuum Sealed Meat Last? Storage Chart
- Benefits of Vacuum Sealing Food
- Are Vacuum Sealers Worth It? A Honest Cost vs. Savings Analysis
Partager:
Best Vacuum Sealers for Home Use in 2026 — And Why Prime Day Is the Perfect Time to Buy
How Vacuum Sealing Helps Keep Food Fresh Longer: A Practical Guide for Everyday Kitchens